Due to a request I am writing this tutorial about my Vocaloid headphones =) both Magnet and the original headsets. It took me several attempts to find a method I was happy with, and to get results that looked good, so don't get annoyed if it doesn't go right the first time.
Shopping list:
Reference image - Always a good starting point.
Paper/newspaper - For making templates.
Craft foam - you can buy this in lots of colours in most craft stores so there will be no need for painting unless you want a real specific colour.
Glue - Hot glue, UHU or super glue is best as it dries quickest and saves you holding it for too long, remember though hot glue melts plastic!
An old/cheap headset or Alice band - usually depends on which headset you are making but headsets from the pound store make things a little easier.
Wire (Magnet/hairband version only) - Thick Normal metal wire, can buy it off the real in some DIY stores, also available in garden centres.
Coloured wire (Magnet only) - Jewellery making wire. Or as an alternative EL Wire for that extra Computerised Disco glow!
Black lace (Magnet only) - Some nice lace about 1-2cm wide.
Optional:
2x Single LED's - Colour of your choosing
2x Battery clips - 9v battery clips are easiest to get hold of
2x9v batteries - you can get them in pound shops in packs of 2! These are the square ones
2x Resistors - you will need to calculate which ones you will need according to what LED's you buy so make sure you note down appropriate information don't worry there's online tools you can look up that will explain this more =)
Acetate - Colour of your choosing can be found in craft shops or you could use clear plastic from almost any household waste, which you can paint with nail varnish on the inside to colour it if need be.


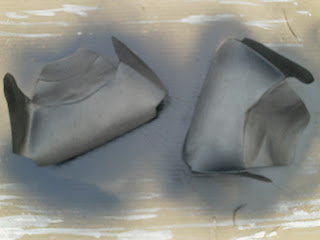
So lets start with the basic Vocaloid headphones. First you need to put the hairband or the headset on your head, make sure its comfortable. If a headband mark where the top of your ears are. If a headset adjust it so its comfortable. then take it off again, this is important as you don't want to stick anything to the headset/hairband in the wrong place. Next get some paper, you want to draw templates to make sure all parts are the same size. Draw the Basic rectangular D shape onto the paper like in the images above until you're happy with it. Cut it out and draw it 4 times on your foam (colour choice is yours however if Miku/Mikou its black, Rin and Len its white and Luka is gold - always check your references). Hold the template up to your head before cutting out, make sure its the right size you want, if not adjust according to what you want.
Decision time, My Luka and Miku headsets patterns on the outside were made differently. my Miku headset I cut out the foam shapes and stuck onto the D shapes, my Luka headset I cut the foam out and stuck another piece underneath to make the 3D texture. The reason I chose to do Luka differently was Due to the LED's you need to cut out a D shape at the front of 2 of your rectangular D shapes and then attach your coloured plastic at the back, this is to allow the light to shine through.
(I hope this makes sense so far)
Next you will need to measure around the edge of your D shapes (only 2 for now), you will need 2 thin strips of foam in the same colour this length around about 1.5cm wide. This strip you glue to the INSIDE edge of the rectangle D, so when viewing from the sides you don't see any joins.
If you're using a headset you will need to put on the headset again, slide your left over D shape underneath the earpiece and put it where it feels fits best to your head. Draw around the headset earpiece on the D shape. Do this for both sides, and then cut it out. Also get the D shape you've been gluing together and put it against the ear with the Mic, mark where the mic is, you will need a hole for it to come through, otherwise it wont sit right. Now sandwich the headset inside the 2 D shapes on each side, and you're pretty much done, If you are using electronics make sure you solder them together and put them inside before gluing it all together, and not to forget leave a bit more of a bigger hole to allow access to the batteries.
If only using a headband you can skip straight to gluing it all together, again unless needing holes for the electronics to sit in =)
To make a mic if you are using a hairband Just cut off a desired length of wire and push it into your Solid D shape. Then cut out 2 small rectangles of the same colour as the main body of the headset and glue it to the end of the wire. (one piece each side) once dried on the inside add 2 black pen mark lines, and you're done! if youre worried about the wire falling out you can glue it in place.
If you're making Lukas headset, I made the headband part from the same 2 layers of foam, as i did the inverted details and glued that onto the headset/hairband first, as to hide joins underneath the ear pieces.
Ok that's it for part 1! Part 2 shall be circuits and Magnet headsets =) hope this helped.
Edit: Below are some progress pictures from my Luka headset.


